Design & Objects

Objects

Page Elements

Creating Page Elements - Group Headers
Group headers print heading information that appears at the top of a group of detail lines and automatically at the top of subsequent pages for this group. There are two types of group headers:
- Explicit group header - an explicit group header is found in the input file and consists of constant or variable heading information.
- Implicit group header - an implicit group header is assigned by FormTrap to a detail line and consists of constant heading information.
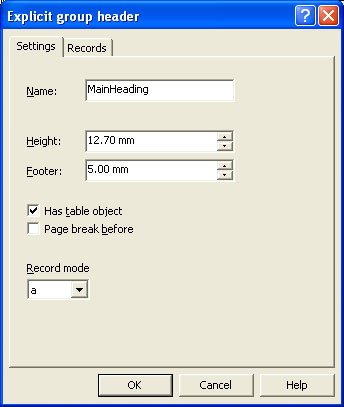
Explicit group header
An explicit group header is found in the input file. On a records mode form, when explicit group headers are created they are assigned a letter of the alphabet, lowercase a through j, as a unique identifier. When FormTrap sees an a - j identifier in the first column of the input file record it will print the corresponding explicit group header.
To add an explicit group header:
- From the Define menu, select Add group header and then Explicit.
- On the Settings tab, set:
- Name - the name is used as a reference for the group header.
- Height - set the height of the group header to accommodate the variable or constant text objects that represent the detail information and any additional formatting objects.
- Footer - space between the end of the current table object and the next table object.
- Has table object - table for the current group of detail lines is printed with the group header.
- Page break before - a new page is generated before the group header prints.
- Record mode identifier - a letter of the alphabet (lowercase) used to uniquely identify the detail line (only applicable in Records Mode).
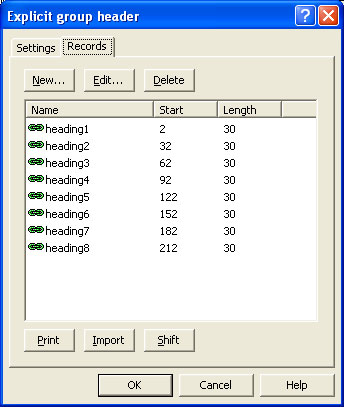
- On the Records tab, define the fields for the group header. FormTrap can then properly extract the fields from the input file.
- More information on Defining Fields in Print Line Mode
- More information on Defining Fields in Records Mode
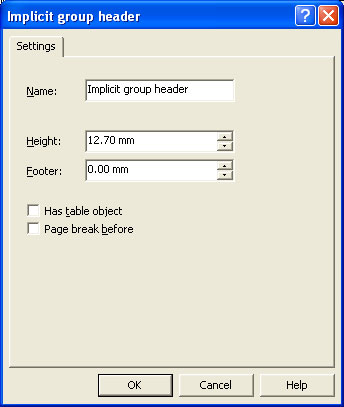
Implicit group header
An implicit group header contains constant heading information and prints at the top of a group of detail lines. The implicit group header is associated with a specific detail line or a group of detail lines. When that detail line is first found in the input file, the implicit group header will print before the detail line as a group heading.
To add an implicit group header:
- From the Define menu, select Add group header and then Implicit.
- On the Settings tab, set:
- Name - the name is used as a reference for the group header.
- Height - set the height of the group header to accommodate the constant text objects that represent the detail information and any additional formatting objects.
- Footer - space between the end of the current table object and the next table object.
- Has table object - table for the current group of detail lines is printed with the group header.
- Page break before - a new page will be generated before the group header prints.
After the implicit group header is defined it is then associated with a detail line.
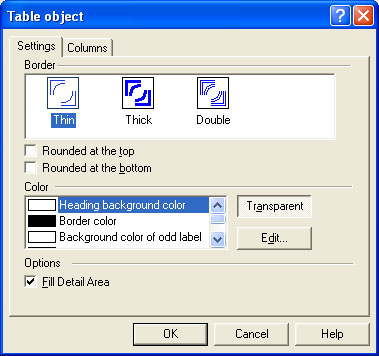
Has table object
If the Has table object box has been checked FormTrap will create a table using the associated explicit or implicit group header at the top of the table. The table object will create a border around the Detail Area. If a new explicit or implicit group header is called the current table object terminates and a new table object with a new header is created.
The newly created group header is outlined by a black rectangle. This black rectangle represents the table object and its properties can be edited to change the color and style of the table printed. The table object columns can also be created and positioned graphically on your form.

To edit the table object:
- Double click on the table object.
- On the Settings tab set:
- Border - set the border style to Thin, Thick or Double.
- Rounded at the top - check the box to give the top of the table rounded corners.
- Rounded at the bottom - check the box to give the bottom of the table rounded corners.
- Colors - select a section of the table, e.g. border color, and then click the Edit... button to change the color of the section. Click the Transparent button to make that section of the table transparent.
- Fill Detail Area - check the box to have the table fill to the end of the Detail Area, regardless of how many detail lines are printed on the page.
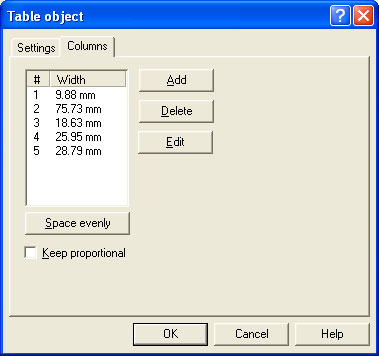
- On the Columns tab, add and modify the columns
for the table. You can also create and reposition column lines
graphically on the form itself.
- Add - click the Add button to add a new column and enter the column width.
- Edit - select a column and click the Edit button to edit the column width.
- Delete - select a column and click the Delete button to delete a column.
- Space evenly - click the Space evenly button to make all columns an equal width.
- Keep proportional - if checked, the columns within the table object remains proportional when the object is resized.
- Click the OK button.
To edit the table object columns graphically on your form:
- Right click on the table object and select Edit Columns from the drop down menu.
- Right click and select Insert Columns.
- Click within the table object to insert a new column line. Continue to insert as many column lines as you need in your table object.
- Once you have finished inserting columns, right click within the table object and select End Inserting Columns from the drop down menu. You can insert new column lines by right clicking and selecting Insert Columns from the drop down menu.
- To move a column line within the table object, click to select the column line and drag it to the desired position or use the arrow keys on your keyboard to nudge the line.
- Once you have finished editing the columns in the table object, right click within the table object and select Accept Changes to save the changes to the table object columns, or Cancel Changes to discard the changes to the table object columns.