Design & Objects
Objects


 Duplicating Objects
- Grouping Objects
- Changing Object Order
- Multiple Object Size
- Multiple Object Properties
- Using the Nudge
Tool
- Using the Alignment
Tool
- Examples
Page Elements
Using the Nudge Tool
 The Nudge tool defines horizontal and
vertical increments to move selected object(s) actioned by the arrow
keys on your keyboard.
The Nudge tool defines horizontal and
vertical increments to move selected object(s) actioned by the arrow
keys on your keyboard.
There are three methods of defining the nudge increment in FTDesign:
- Pre-defined - select the nudge increment from the pre-defined options
- Custom - enter a custom vertical and horizontal nudge increment.
- Difference between selected objects - set the nudge increments to the horizontal and vertical difference between two selected objects (shown only when two objects are selected).
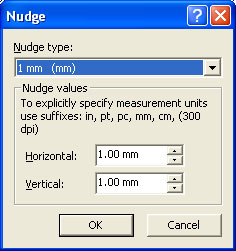
To set the nudge increment:
- Click the Nudge tool button or select Nudge from the Tools menu.
- Either select a value from the Pre-defined value menu, or enter a value in the Horizontal and Vertical text boxes.
- Click the OK button.
Once the nudge increment is defined, use the arrow keys on the keyboard to move selected objects one increment per press, in that direction.
More information on Measurement Units
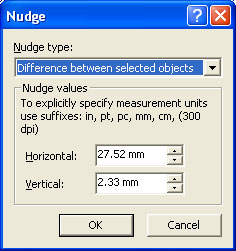
Difference between Selected Objects automatically calculates and sets the nudge increment to the difference between two selected objects. This is handy if you want to create uniform space between text objects or lines.
To set the nudge distance to the difference between two selected objects:
- Select two objects on your form, either by clicking each of them while holding down the SHIFT key or by drawing a marquee around the objects.
- Click the Nudge tool button or select Nudge from the Tools menu.
- Select Difference between selected objects from the Pre-defined values menu. The Horizontal and Vertical nudge values will be automatically calculated, as shown in the Nudge value box.
- Click the OK button.
Once the nudge increment is defined, you can use the arrow keys on the keyboard to move selected objects one increment per press, in that direction.