|
Configuring FTSpooler as a LP Server |
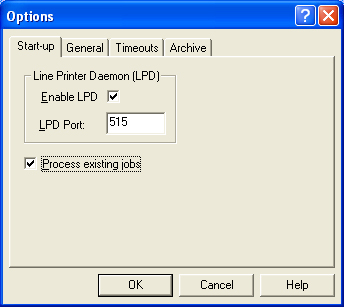
To enable FTSpooler to act as an LP server:
- Select
Start up from the Options menu.
-
Check the Enable LPD checkbox. You may specify the port
number to avoid Windows/UNIX conflicts.
Contact Us if you would like more information on
this feature.
|
|
|
Top
|
|
Printing from Windows Applications |
|
In Windows-based systems create an LPR printer port for Windows applications to be
able to "print" jobs to an LP Server. These printers
act as redirection tools so that applications
can print to the FTSpooler queues. It will help to think
of them as "Virtual" printers as
they have no direct connection to a physical
printer.
Before creating your LPR printers it is
necessary to create the corresponding queues in
FTSpooler. The name(s) of the FTSpooler queue(s) will be
used when creating the LPR port.
More information on Creating an FTSpooler Queue
For Windows XP:
Ensure the following prerequisites are in place before you get
started:
Configuration steps:
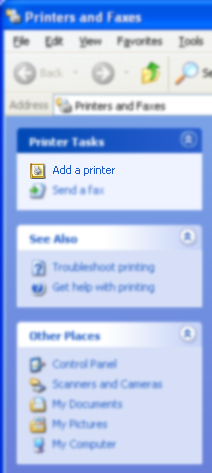
- Select Printer and Fax from the Start
menu.
- Click on Add a Printer in the left bar.
-
Click Next and choose Local Printer
in the Add Printer Wizard. Do ensure the
Automatically detect and install my Plug and Play
printer box is not checked and click Next.
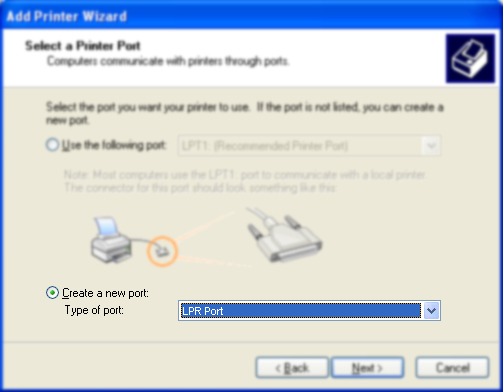
-
Select Create a new port and then choose
LPR Port from the Type of port drop
down menu.
-
In the Name or address of server providing
LPD text box, enter the IP address of the
machine on which FTSpooler is installed
(e.g.192.168.0.1). In the Name of printer or
print queue on that server text box, enter the
queue name defined in FTSpooler. Click OK.
-
Choose the printer driver according to the final
destination printer, and then click Next.
-
Enter the printer name in the Printer Name
text box. We recommend clearly labelling this as a
"virtual" FormTrap queue by using the following
format: Q_location to a MAXIMUM of
TWELVE characters. Click Next.
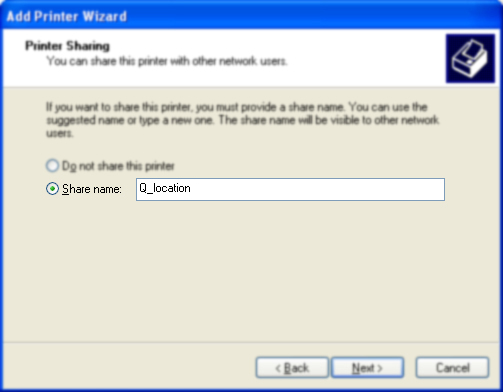
-
Select the Share as option and use the
same printer name used in step above. Click Next.
-
In the Location and Comment window, enter
related information and then click Next.
- Select No on Print Test Page and click
Next.
- Click Finish button to complete the
installation.
|
|
|
|
|
|
Top
|
|
Printing from UNIX applications |
These printers act as redirection tools
so applications can print to the FTSpooler queues. Before
creating your LPR printers create the
corresponding queues in FTSpooler. The name(s) of the
FTSpooler queue(s) are used when creating the LPR
port.
More Information on Creating a FTSpooler Queue
The following table splits the different UNIX-based
platforms on which FormTrap runs according to their
basic printing subsystem. Use the table below as a
reference guide when setting up Unix Systems for use
with FormTrap.
|
System V |
BSD |
|
SCO Open Server |
Linux |
|
SCO Unix Ware |
FreeBSD (Linux Binary) |
|
Sun Solaris |
HP/Compaq/DEC Tru64 |
|
HPUX |
|
IBM AIX is a special case and does not fall under
either category. Please
contact us to configure FormTrap to run on IBM
AIX.
For a System V UNIX print subsystem:
|
Description of steps |
Commands |
|
|
|
Define the print queue
|
|
- Configure your PATH environment
variable:
|
PATH=$PATH:/usr/bin:/usr/sbin
|
|
- Shut down the print subsystem:
|
lpshut |
|
This creates local print queue named
ftqueue,
headed for the remote print queue
(rp=) ftqueue
on the remote machine
(rm=) nt_server.
|
lpadmin -pftqueue -v/dev/null -mrmodel
-icmrcmodel
-osmrsmodel -ob3 -ormnt_server
-orpftqueue
|
|
- Enable the new queue for use:
|
enable ftqueue
accept ftqueue
|
|
- Bring the print subsystem back up:
|
lpsched |
|
- To view and check the configuration and
status of this queue:
|
lpstat -pftqueue |
|
Print to this Queue
|
|
- To print to this queue use the command:
|
lp -dftqueue myfile |
|
For a BSD UNIX print subsystem:
|
Description of steps |
Commands |
|
|
|
Define the print queue
|
|
- Define a print queue headed to the
remote lpr
print queue created by FTSpooler Printers
are defined in the file
/etc/printcap.
Different X-Windows systems will provide
programs to interface to the printcap file
for ease of editing. These instructions
assume that file is edited using a simple
command line editor such as pico or vi.
Insert the command in the right column into
the print cap
file:
This creates a local print queue named
ftqueue, headed for the remote print queue
(rp=) ftqueue
on the remote machine
(rm=) nt_server.
The path
/var/spool/lpd/ftqueue
on the right may be incorrect depending on the
system settings. Copy the path from another
entry if possible, or see
man lpr,
which should tell you your UNIX normal path.
You may also need to manually create the
directory
/var/spool/lpd/ftqueue. Use
existing entries as a guide.
|
ftqueue:\
:sd=/var/spool/lpd/ftqueue:\
:mx#0:\
:sh:\
:rm=nt_server:\
:rp=ftqueue:
|
|
Print to this Queue
|
|
- To print to this queue use the command:
|
lp -p -lmyfile |
|
|
|
|
Top
|
|
Configuring Printers in your Application |
Once you have created the LPR printers you must
then create printers in your application to
directly output data to these "virtual printers". To
configure the printer in your application:
-
In the printer setup of your program, create new
printers to direct output to FormTrap. These
should have a meaningful name, or use the same name
as the "virtual" printer defined above.
More information on
Printing from Windows Applications
-
For each printer, the device path settings must
point to the appropriate LPR printer just
created.
|
|
|
Top
|
|
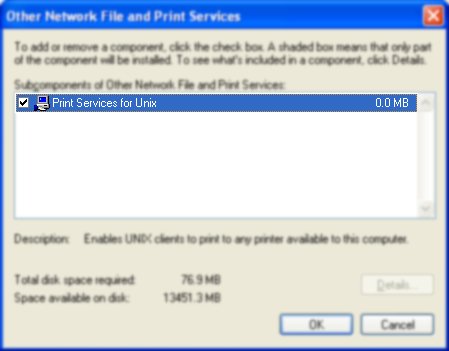
Instructing on how to step up the LPR port in your PC |
For Windows XP:
-
Go to Start menu - Control Panel,
choose Add or Remove Programs.
-
Choose Add/Remove Windows Components and the
Windows Components Wizard pops up. Check Other
Network File and Print Services option if not
selected, then press the Details button.

-
There will be a list of available subcomponents of
Other Network File and Print Services in your
PC, choose the one called Print Services for Unix.
Then click OK.
- Click Next in
the
Windows Components Wizard Screen to finish
installation.
|
|
|
Top
|
 Setup process
may alter for different operating system.
Setup process
may alter for different operating system.