Area, Field and Rule Properties
Areas contain Fields and are defined by Rules on those Fields.
This section show how to modify areas, add and modify fields within the areas and how to set and
modify rules on fields to recognize the area.
Adding New Fields
These are the Field icons.

Select New field, this gives an I-Bar cursor  , press
mouse and drag over the data that forms a field, let go to define
the field.

This window opens, give the field a Name. Closing the window
and selecting the field shows its name (in yellow, above the
field).


Right click on the field, and select as shown to make this a
"Rule".
This rule requires an "Exact match" with the highlighted field. All
Rules within an area must be true to recognize an area. Rule fields
are shown in Green rather than yellow.

You can "lock into" field generation by pressing the I-Bar icon
![]() which allows continual generation of new fields until turned off.
which allows continual generation of new fields until turned off.
Selecting Area, Field or Rule for Edit
Areas properties and associated Fields and Rules are modified via Edit, Properties icon
 with a field or area selected ....
... or by selecting a field or rule
![]()
![]() and
the
and
the ![]() icon from the Document window ...
icon from the Document window ...
_right_click_menu.gif)
... or by pressing Mouse Right from the (data) screen ...
... which opens an options list.
Properties of selected field ... is greyed unless exactly one field is selected.
Click here to see how to modify an individual field.
Click here to see how to modify an individual rule.
Area Properties
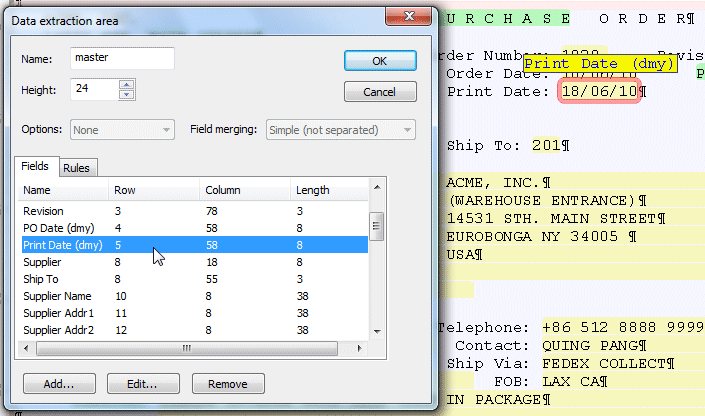
This is the Area properties window.
You can add a new field, edit or remove a field from this list.
-
Name (of the area) may be changed - except the master area.
-
Height is the number of lines included in this
area.
- Options apply to areas - except the master area.
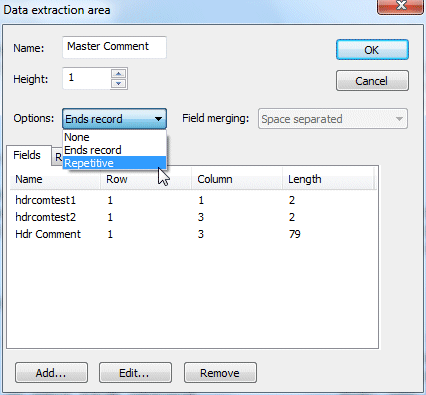
This is the Options pull-down.
Ends record means this field finalizes a record.
Use this for the last line of multi-area records (product description
KICKPLATE in these examples):
- No optional lines.
-

- Four optional lines.
-

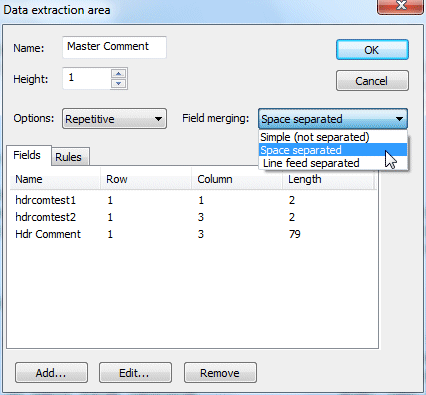
Repetitive concatenates adjacent lines in input into one field, and opens Field Merging
with these choices for the inter-line spacing in the merged field:
Field tab of Area Properties

The Field tab of the Area windows shows fields. Add, Edit or Remove buttons
are available, Edit modifies the selected field.
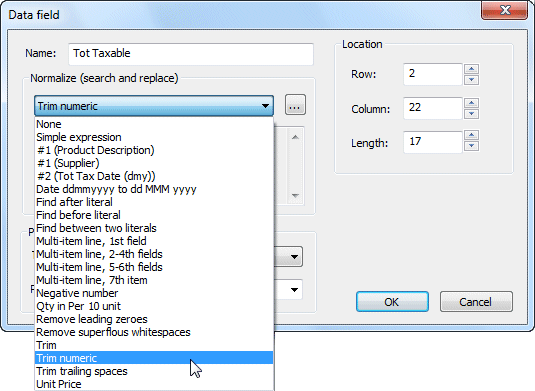
Field properties are entered or edited through this window:
Normalize is the RegEx used to reformat input data
to the XML field. Predefined expressions are provided, and you can
include your own. Data is normalized in the output XML file. The
common normalizations are:
Remove leading zeroes - used for records mode raw data - removes leading spaces and zeroes - retains one zero if the field is all zero.
Remove superflous white space - used to remove leading, trailing and internal multiple spaces (leaving one internal space).
Trim numeric - used to trim spaces from numerics, including substitution of 0 (or 0.00) if the field is empty.
Trim - trims leading and trailing spaces from the data - use for text data to avoid doing this at form design time. This is required for fields used as substitutions.
More information on RegEx
hints
More information on RegEx
expressions for download
Note: FormTrap does NOT support RegEx under the Support and Upgrades contract, help with or generation of custom RegEx expression is chargeable. New expressions may be added from time to time by FormTrap to the download list on the website.
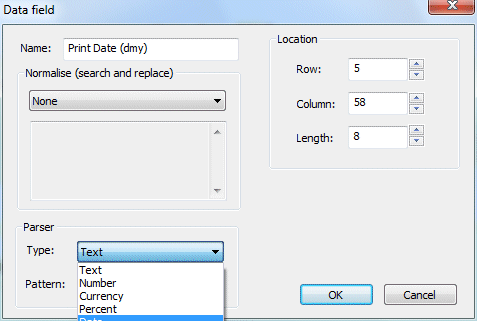
Parser Type defines data content and
defaults to Text. Number, Currency, Percent and Date recognize data
and require Pattern. Pattern defines what the data
parser looks for.

For Date, select from the pull-down or enter your own pattern to define how the
input date (or time) is formatted, these are to Microsoft standards.
Other characters (for example, slashes) are checked on input and output, so must be correct.
d one or two digit day dd two digit day M one or two digit month MM two digit month MMM Month three character literal in Locale notation, case does not matter - eg Jun MMMM Full month literal in Locale notation, case does not matter - eg June yy Two digit year yyyy four digit year

Number pattern may be chosen or a new pattern entered. Standard representation is a
leading number, or leading minus character plus number where negative. This requires just the left entry in the list.
Any other representation requires either selection of Normalize, Negative number or you
must use an entry with BOTH left-positive and right-negative, semi-colon separated (as shown) in this list. Embedded
thousand separators must be shown if the number comes in that way.
Position for the sign must be correct in respect of spaces before the sign (trailing sign) or
after the sign (leading sign).
The last pattern used for this form is suggested next time as most files are consistant in their data
representation.
Rules Tab of Area properties
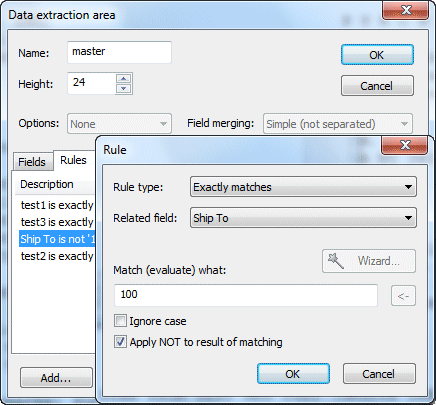
Rules tab within Rules and other area properties provides Add, Edit, and Remove rules.
Add and Edit open the Rule window.
Rule type: has several alternatives:
- Exactly matches is the usual selection (there is an "Apply NOT to result of matching" selection later to give negative rules).
- Related field opens a pull-down showing sorted field names, chose the one to test.
- Match (evaluate) what shows the comparison value. This MAY NOT be an expression. Select Rule type: Matches regEx expression if an expression is required.
- Ignore case ticked does a comparison ignoring capital letters, ie HELLO, Hello and hello all compare as equals.
- Apply NOT to result of matching ticked is a "not equal" comparison.

Rule Type: Contains is similar to Exactly matches but does the comparison anywhere in the field.
An expression MAY NOT be entered in Match (evaluate) what. Select Rule type: Matches regEx
expression if an expression is required.
Rule Type: Is empty tests for the absence of data (line feeds, etc. are ignored).
Rule Type: Matches regex expression provides a Wizard to select or key in the RegEx expression.
Rule Type: Evaluates numeric expression to true or non zero allows entry of a muParser expression.

For Matches regex expression, press the Wizard  button.
The Match pull down shows rule expressions. Normally you will want to modify something
like Contains either one of two to match what you require (this expression is common for different
document names of the same format). The bottom of this screen shows actions where you would normally choose
Add (copy) ... to modify and create a new expression.
Below shows the "Before and After" of generating a new RegEx expression from the list via Add (copy)...
that identifies different types of Invoice documents from their titles.


