Queue Properties
Select the queue to change by highlighting it. Update the queue settings in the Properties Bar on the right side of the FTSpooler Window.
Fax Tab
This option sends FormTrap documents as faxes using Windows Fax Service.
Windows Fax Service requires the fax configuration in Microsoft® Fax Console. Instead of a fax machine, you can use a modem and scanner to send or receive faxes from your computer. The modem and scanner have no specific requirements. FormTrap does not use the scanner and deals with outgoing faxes only.
More Information on Configuring Windows Faxes in Windows XP or, alternately you can go to Start menu - Help and Support - search for fax to see relevant articles.
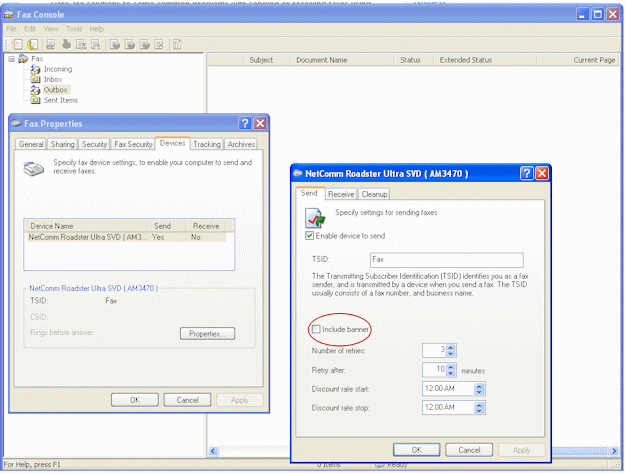
Note: You must change Windows Fax and untick Include banner, this is the screen for XP-Pro and is similar for later operating systems. Please see the Knowledge Base if you have problems with your initial fax tests.

Windows Fax Service is normally activated using Associated File entries with any default option overridden by the Associated File. Like any of the "special delivery" methods, the Properties tab, Associated file entries prompt must be set correctly.
More information on Windows Fax Service and Associated Files see Reserved Names.
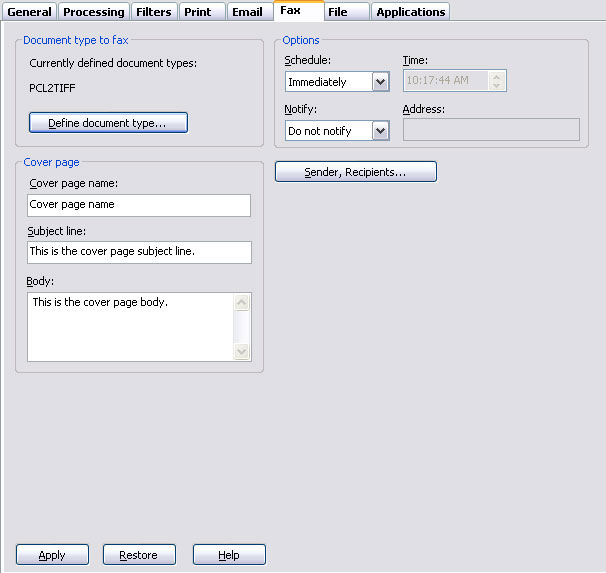
To set the properties of faxing:
- Click Define document type to specify the document type. Fax requires TIFF for faxing so select the filter that converts from your document type (as indicated in Processing tab, Data Folder) to Tiff; i.e. one of :
-
- PCL to Tiff where Data Folder is marked as
PCL

- PCLXL to Tiff where Data folder is marked
as PCLXL

- PostScript to Tiff where Data folder is
marked as PostScript

- PCL to Tiff where Data Folder is marked as
PCL
- More information on Define Document Type
- The usage of Cover page is OPTIONAL. The Cover page must be first created using Windows Fax Cover Page Editor. You can launch it from Start - All Programs - Accessories - Communications - Fax - Fax Cover Page Editor, create, edit and save your cover page. In FTSpooler fill in the Cover page name i.e. the full path of the cover page, Subject line, and Body. You can use associated file variables for Subject line and Body.
- Use an associated file variable by quoting the associated file name in square brackets "[" and "]". For Example, quoting Your Order [PO Num] would deliver “PO22344” from the associated file line PO Num=PO22344 to give Your Order PO22344.
- More information on Using Associated Files in FTSpooler Queues Properties
- Select one of the three Schedule options: Immediately, Off peak and At specified time (Time required).
- Select one of the three Notify options:
- Do not notify
- Email to sender - requires a special email SMTP notification process (mailnfy.exe to run in the background).
- Email to inbox - only works with Microsoft® Exchange.
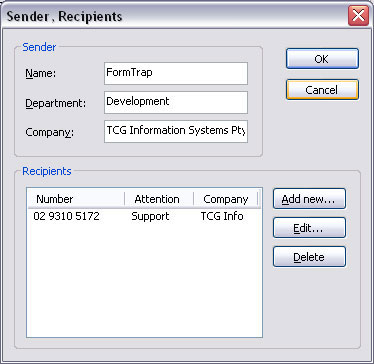
- Click the Sender, Recipients button to manage the details of the fax sender and recipients. This is the default and is normally overwritten by the Associated File field W2KFax from the document.
- More information on Managing Sender, Recipients Details
-
Click the Apply button to save the changes.

Manage the sender and recipients information
To manage the sender and recipients information:
- Enter sender information sender's Name, Department and Company.

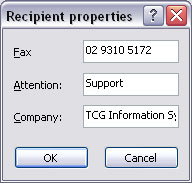
- Click the Add new, Edit or Delete button to change the recipient lists.


